> ## Documentation Index
> Fetch the complete documentation index at: https://bruno-a6972042-tutor-mock-server.mintlify.site/llms.txt
> Use this file to discover all available pages before exploring further.
# Mock Servers from Collection
> Walk through saving collection response examples, creating a mock server from them, syncing, adding rules, and serving the mock locally.
[Response examples](/send-requests/res-data-cookies/response-examples) are snapshots of how an API behaves with success payloads, validation errors, empty lists, and other states you care about. Once they've been saved as an example, you can document those cases, share them with the team, and with Mock Servers, serve them locally so a frontend or integration test can immediately hit the endpoints without needing the real backend to be up and available.
Mock Servers are in **Beta**. Open **Preferences → Beta** to turn on the **Mock Server** feature. The **Mock Servers** section appears in the sidebar only after you opt in.
## 1. Create or save response examples
You can create an example from scratch, or save a live response after you send a request.
### Create an example from scratch
Use this when you already know the status, headers, and body you want to mock, without sending the request first.
1. Open Bruno and open the collection that contains the request.
2. Click the request’s context menu (**⋯**, three dots).
3. Select **Create Example**.
4. Enter an **Example name**, optional **description**, **status code** (`200 OK` by default), and **body type** (`JSON` by default).
5. Click **Create Example**.
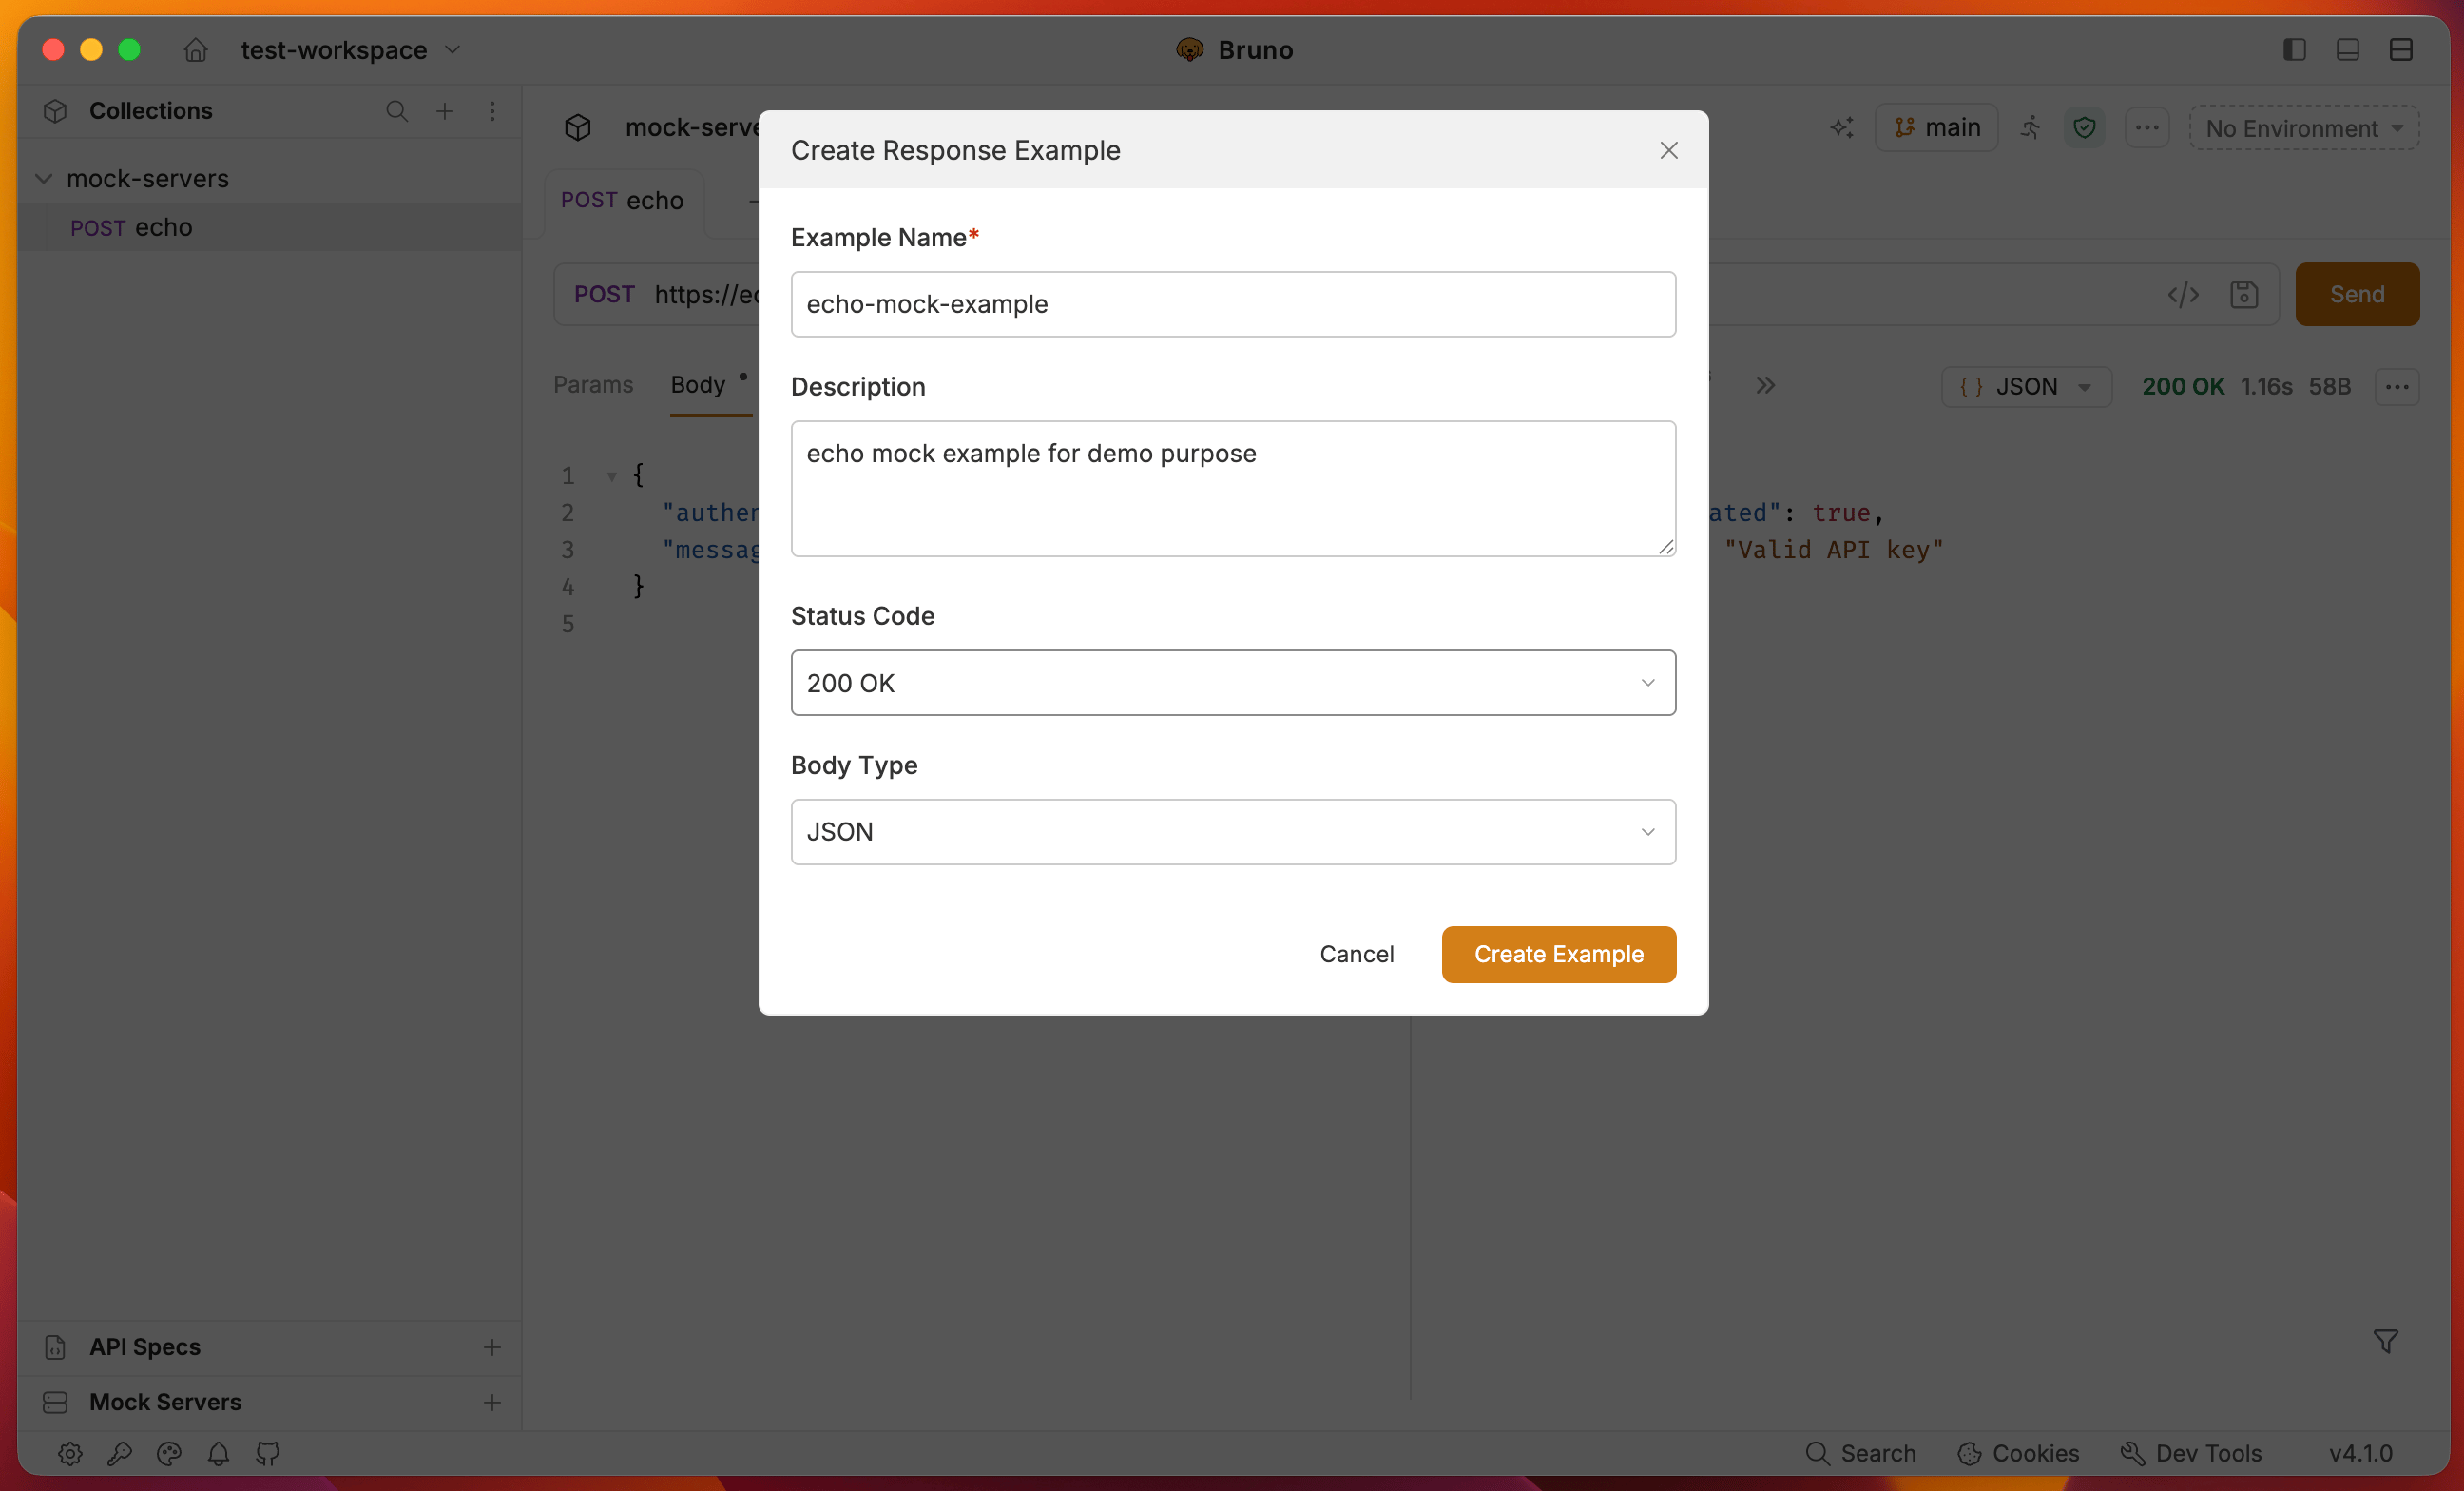 The example appears nested under the request.
### Save a live response as an example
Use this when you want to capture a real API response.
1. Send the request and wait for the response.
2. In the Response tab, click the **Save Response** *(Bookmark)* icon (top-right).
3. Enter a name for the example.
4. Click **Save**.
See [Response Examples](/send-requests/res-data-cookies/response-examples) for the full save flow.
Create at least one example per route you plan to mock. Multiple examples on the same method and path become alternative mock responses once you add [rules](/mock-servers/run-mock-server#rules).
## 2. Create a Mock Server tied to a Collection
With examples in the collection, create a mock server that uses those examples as its source.
If you have not already, enable Mock Servers under **Preferences → Beta**.
1. In the sidebar, click the **+** icon next to **Mock Servers**.
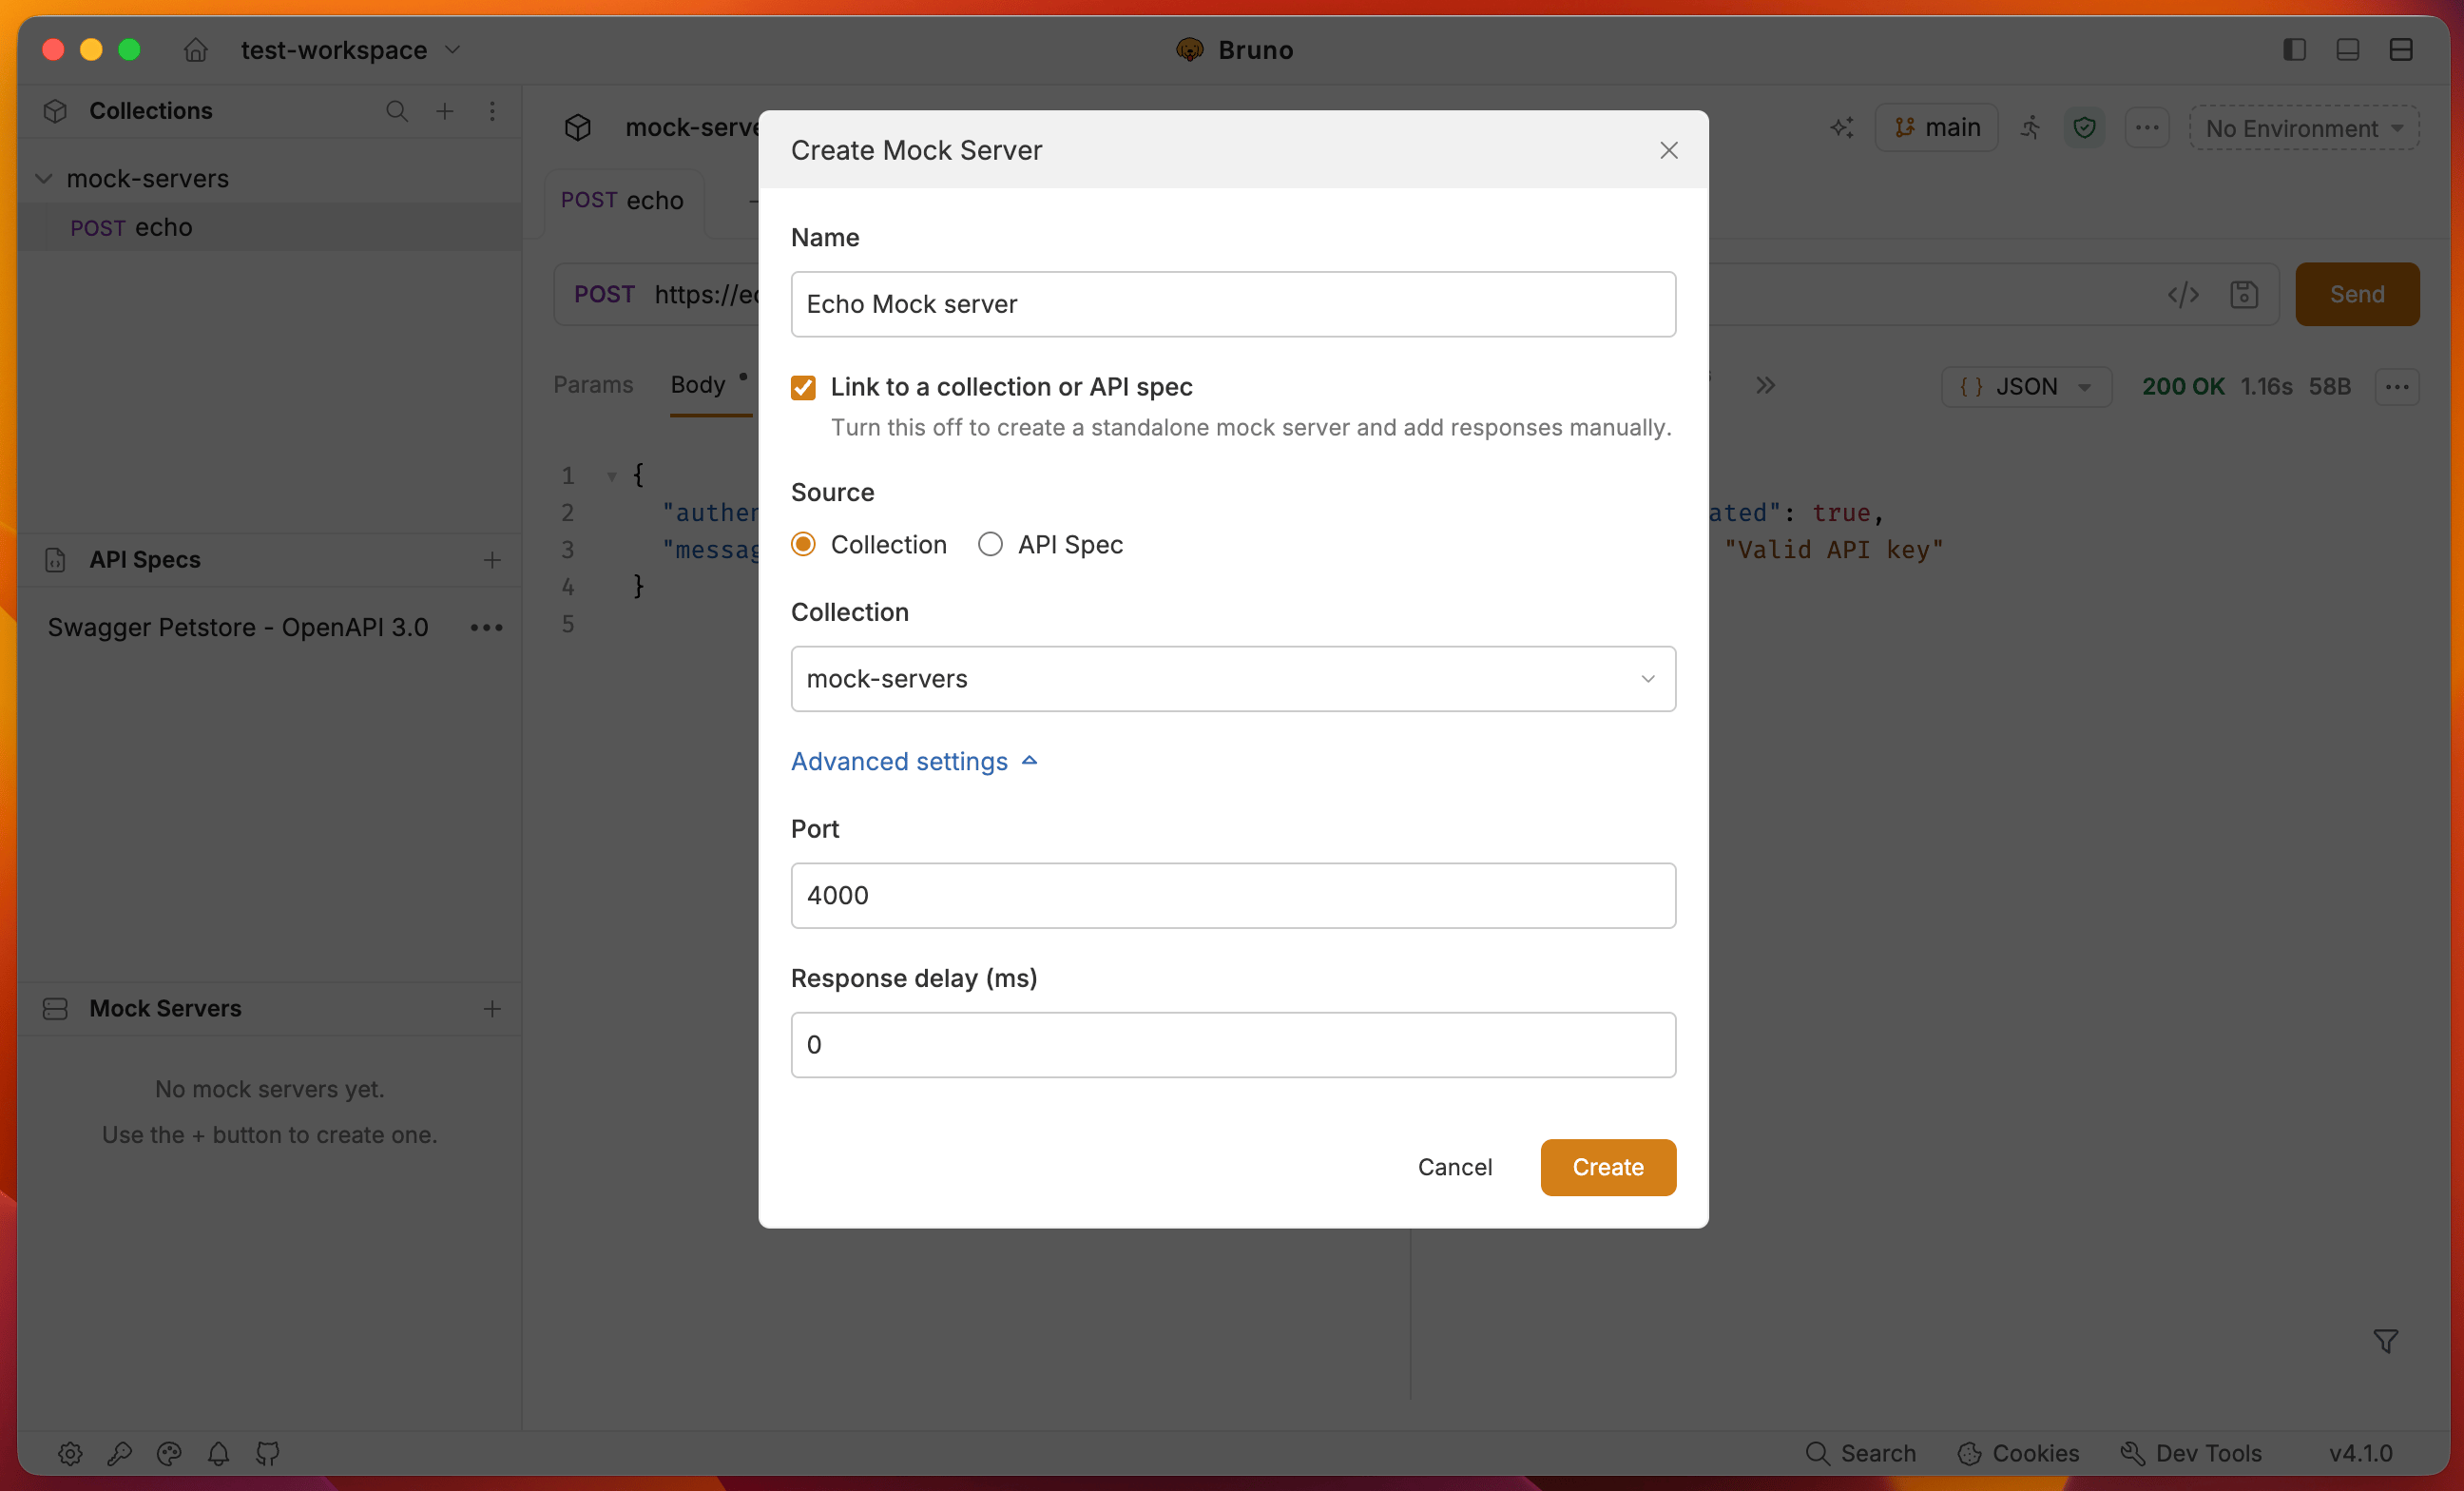
2. Enter a **name**. Keep the source as **Collection** (this is the default).
3. Choose the collection from the dropdown.
4. Optionally open **Advanced settings** to set the **port** and **response delay**.
5. Click **Create**.
The example appears nested under the request.
### Save a live response as an example
Use this when you want to capture a real API response.
1. Send the request and wait for the response.
2. In the Response tab, click the **Save Response** *(Bookmark)* icon (top-right).
3. Enter a name for the example.
4. Click **Save**.
See [Response Examples](/send-requests/res-data-cookies/response-examples) for the full save flow.
Create at least one example per route you plan to mock. Multiple examples on the same method and path become alternative mock responses once you add [rules](/mock-servers/run-mock-server#rules).
## 2. Create a Mock Server tied to a Collection
With examples in the collection, create a mock server that uses those examples as its source.
If you have not already, enable Mock Servers under **Preferences → Beta**.
1. In the sidebar, click the **+** icon next to **Mock Servers**.
2. Enter a **name**. Keep the source as **Collection** (this is the default).
3. Choose the collection from the dropdown.
4. Optionally open **Advanced settings** to set the **port** and **response delay**.
5. Click **Create**.
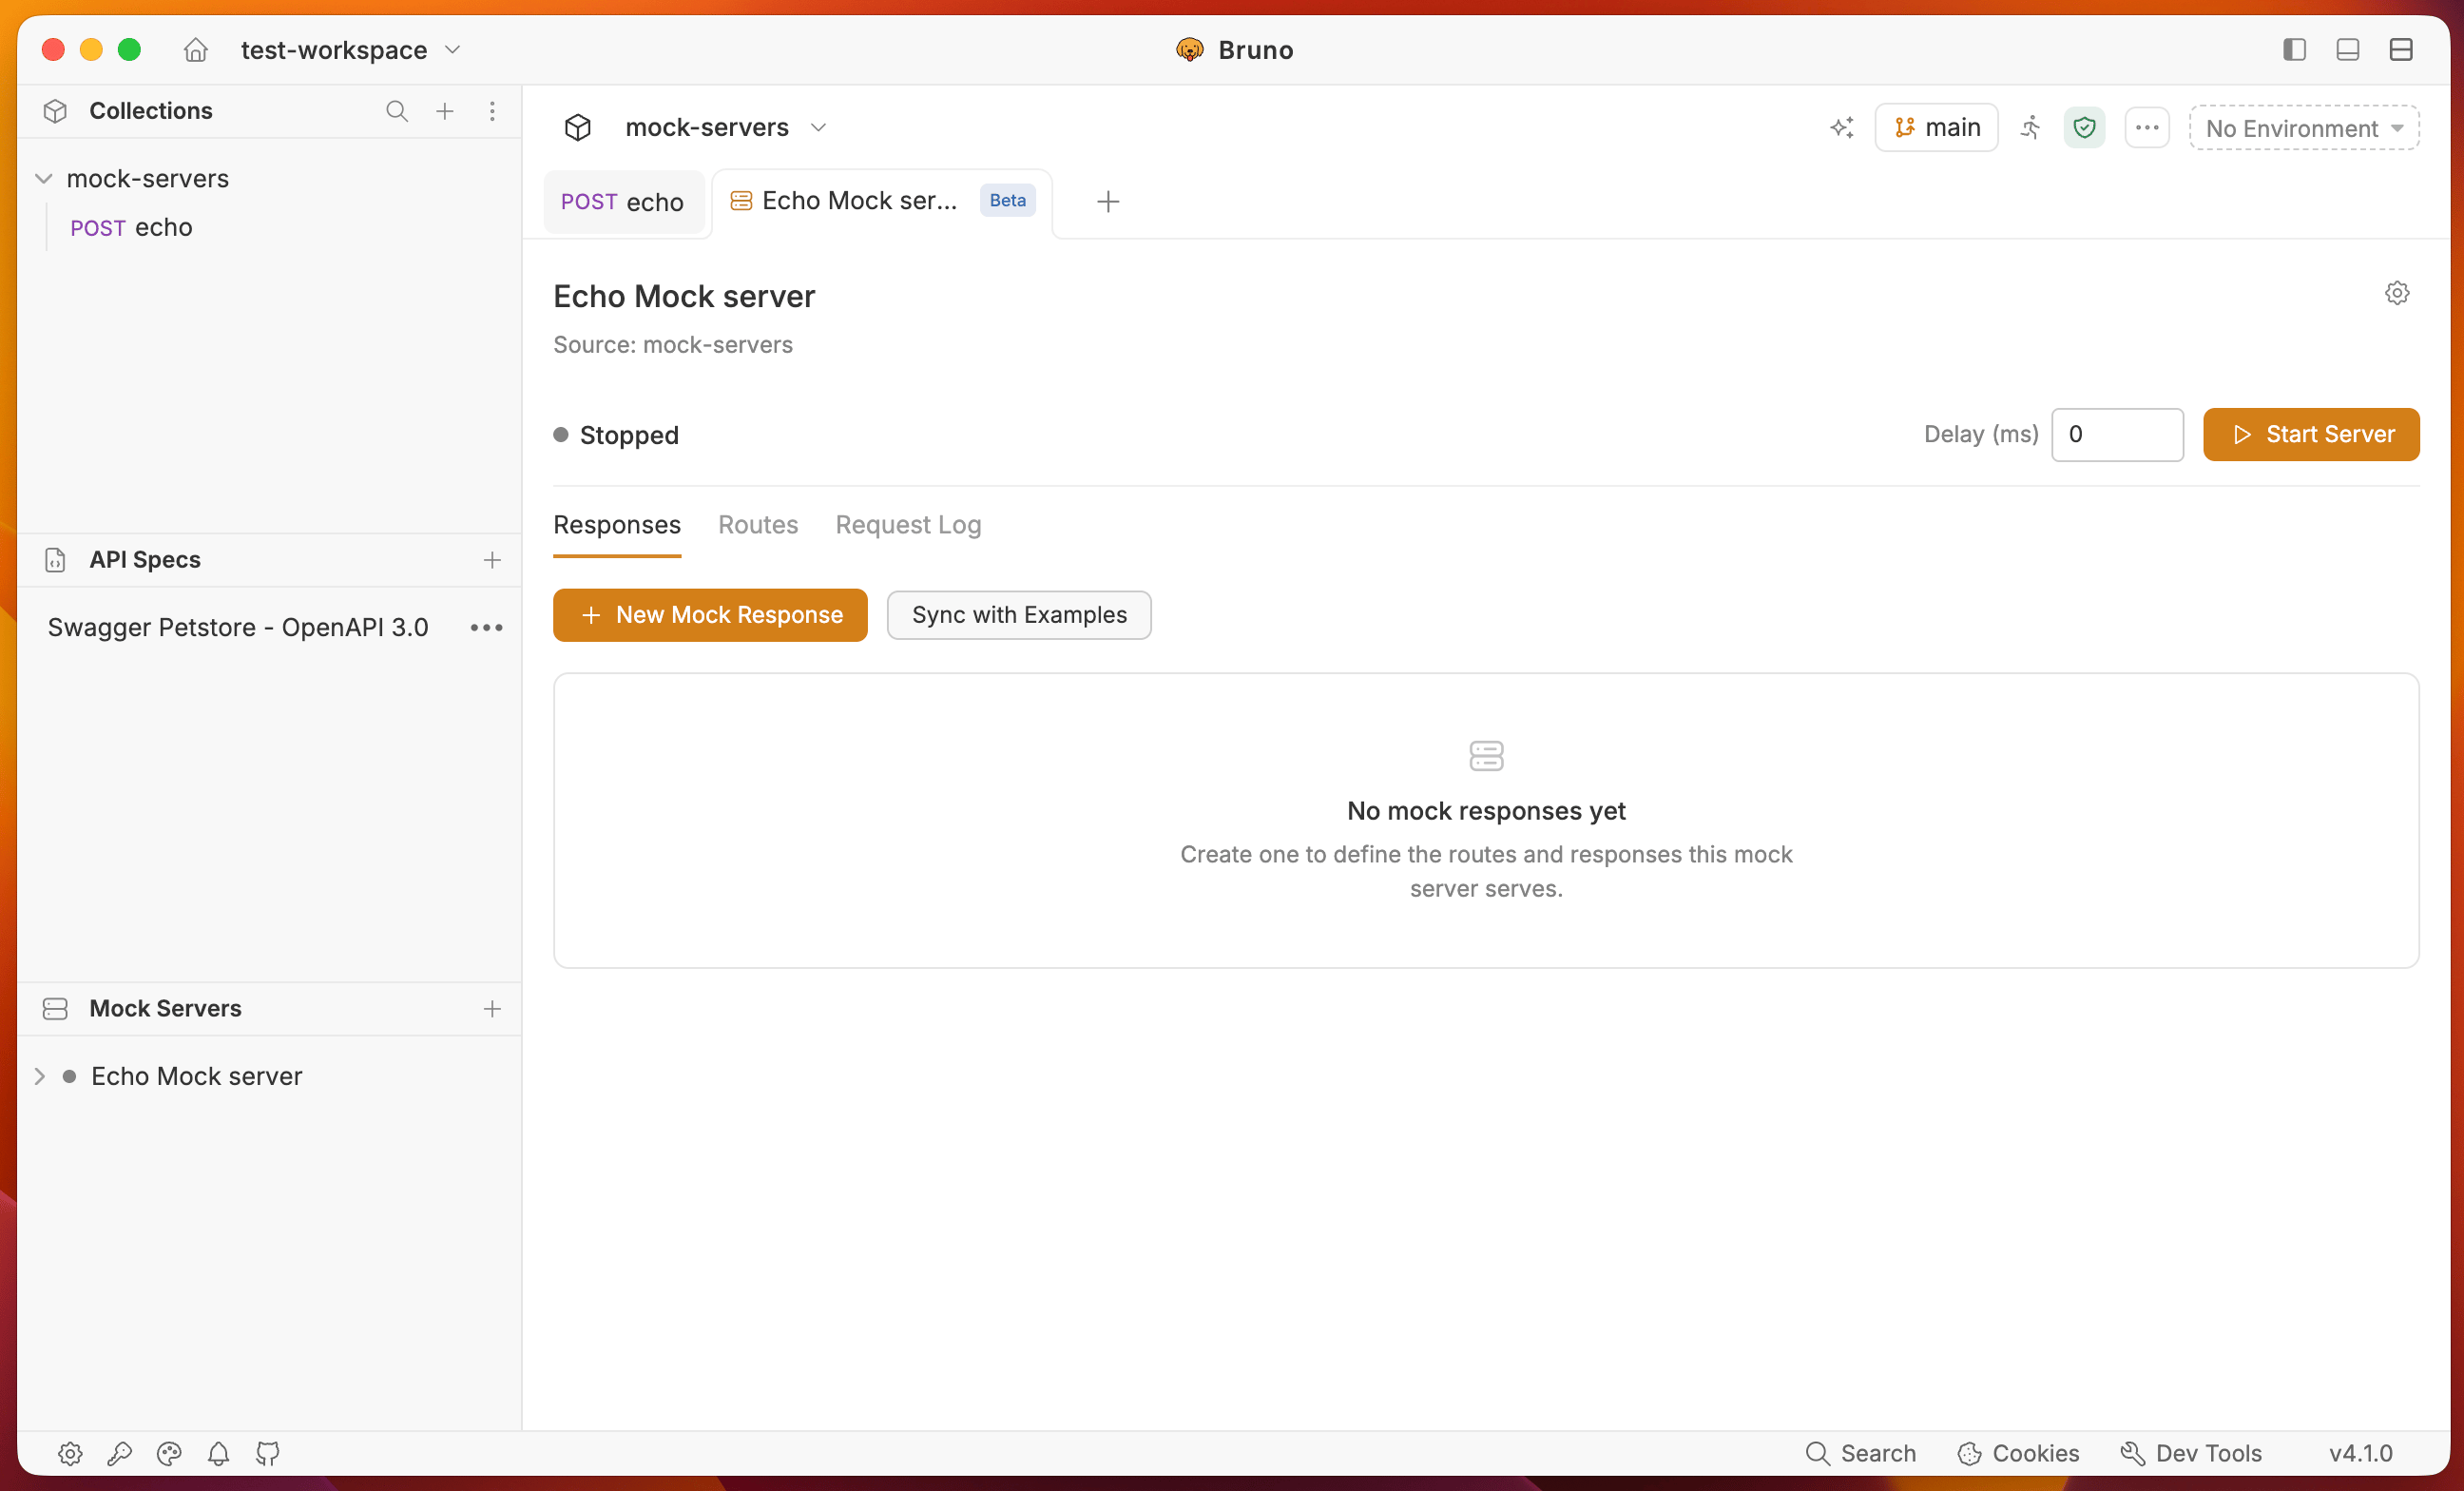
 Bruno opens the mock [dashboard](/mock-servers/run-mock-server#dashboard-interface-walkthrough). The server is not running yet, you still need to sync examples, and then start it.
 ## 3. Sync with Examples
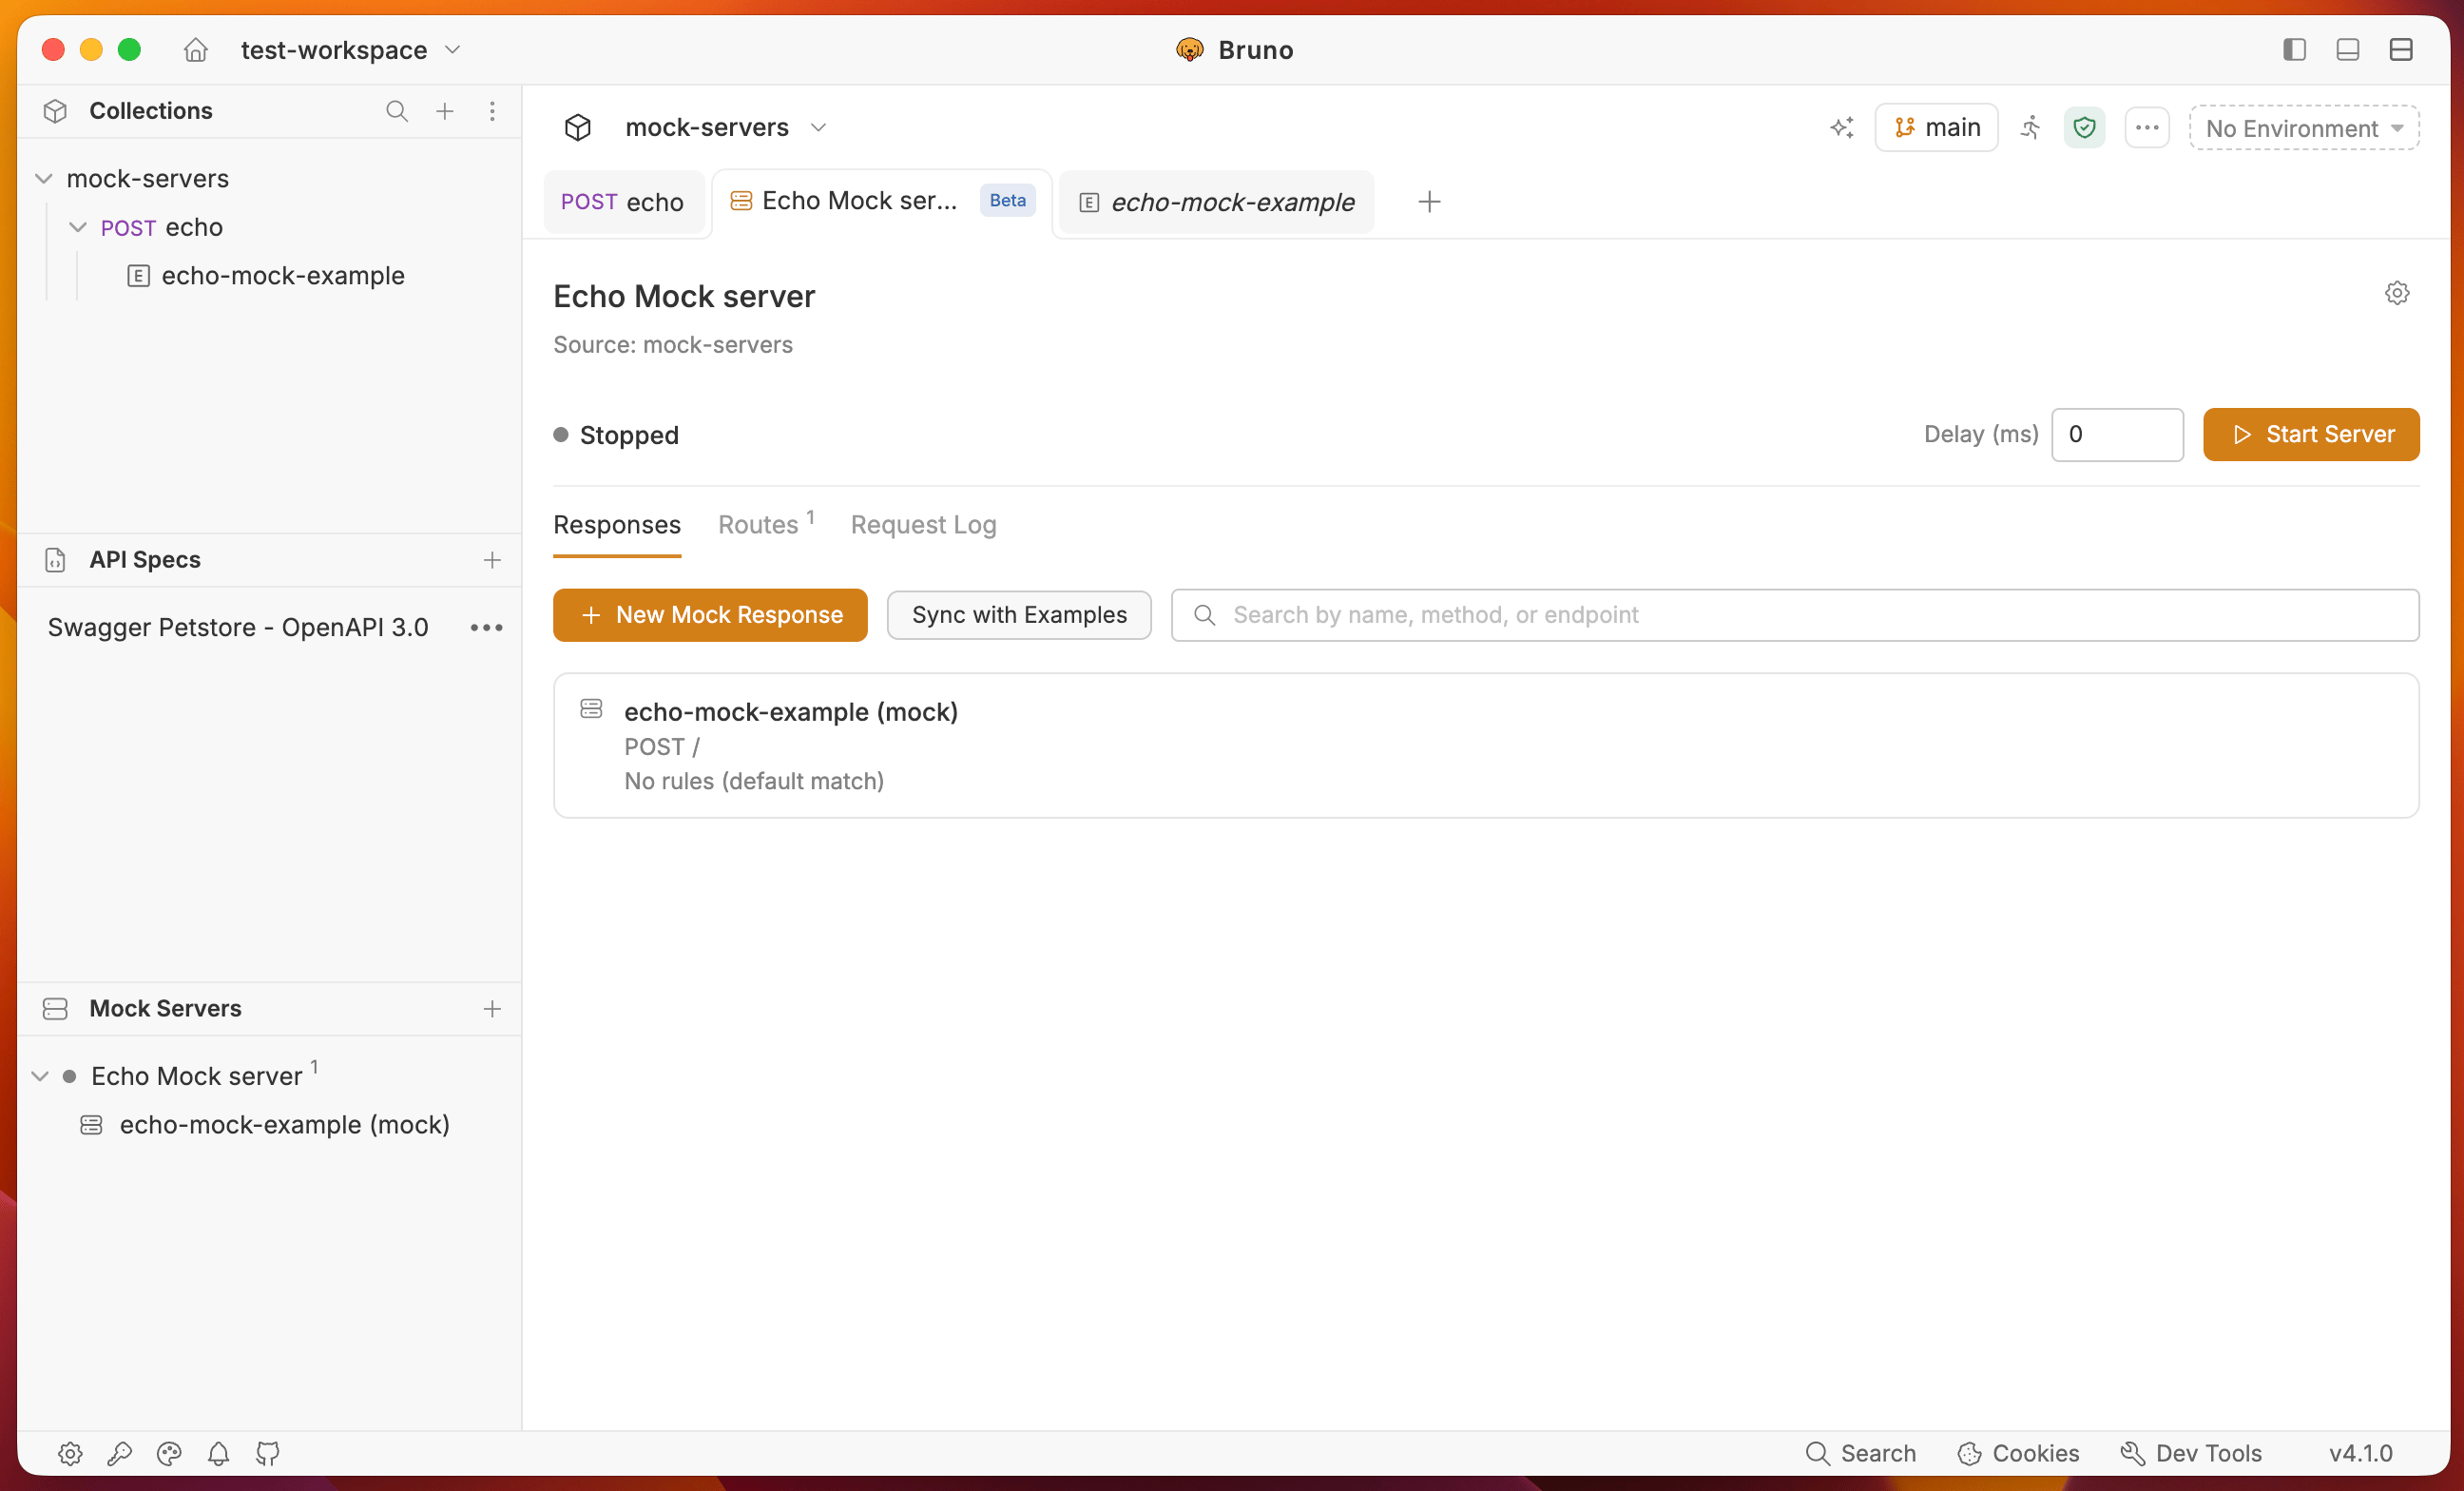
On the dashboard, click **Sync with Examples**. Bruno copies every saved example in the linked collection into mock responses (method, path, status, headers, and body).
Those responses appear on the **Responses** tab. Use the search field to find a specific example by name or path.
## 3. Sync with Examples
On the dashboard, click **Sync with Examples**. Bruno copies every saved example in the linked collection into mock responses (method, path, status, headers, and body).
Those responses appear on the **Responses** tab. Use the search field to find a specific example by name or path.
 Sync again after you add or change examples in the collection so the mock stays aligned with the source.
## 4. Add a new mock response
You are not limited to synced examples. Click **New Mock Response** and provide:
* A **name**
* Optional **description**
* **Status code** (`200 OK` by default)
* **Body type** (`JSON` by default)
You can use the **copy from a collection example** option to reuse a request already in the collection instead of starting from a blank response.
## 5. Start the server
**Start the server** from the dashboard header. Bruno starts with port **4000** and increments to find a new available port for each new mock server. You can also change it in the **Advanced settings** upon creation or via the gear icon. After the server is running, each mock API is available at `http://localhost:4000` or its chosen port.
## 6. Response Editor
Each mock response opens in an editor:
* Left pane: rules, demo request, response URL, try button and open as new request button (when to return this response)
* Right pane: expected body, headers and try results (what the response should look like)
Sync again after you add or change examples in the collection so the mock stays aligned with the source.
## 4. Add a new mock response
You are not limited to synced examples. Click **New Mock Response** and provide:
* A **name**
* Optional **description**
* **Status code** (`200 OK` by default)
* **Body type** (`JSON` by default)
You can use the **copy from a collection example** option to reuse a request already in the collection instead of starting from a blank response.
## 5. Start the server
**Start the server** from the dashboard header. Bruno starts with port **4000** and increments to find a new available port for each new mock server. You can also change it in the **Advanced settings** upon creation or via the gear icon. After the server is running, each mock API is available at `http://localhost:4000` or its chosen port.
## 6. Response Editor
Each mock response opens in an editor:
* Left pane: rules, demo request, response URL, try button and open as new request button (when to return this response)
* Right pane: expected body, headers and try results (what the response should look like)
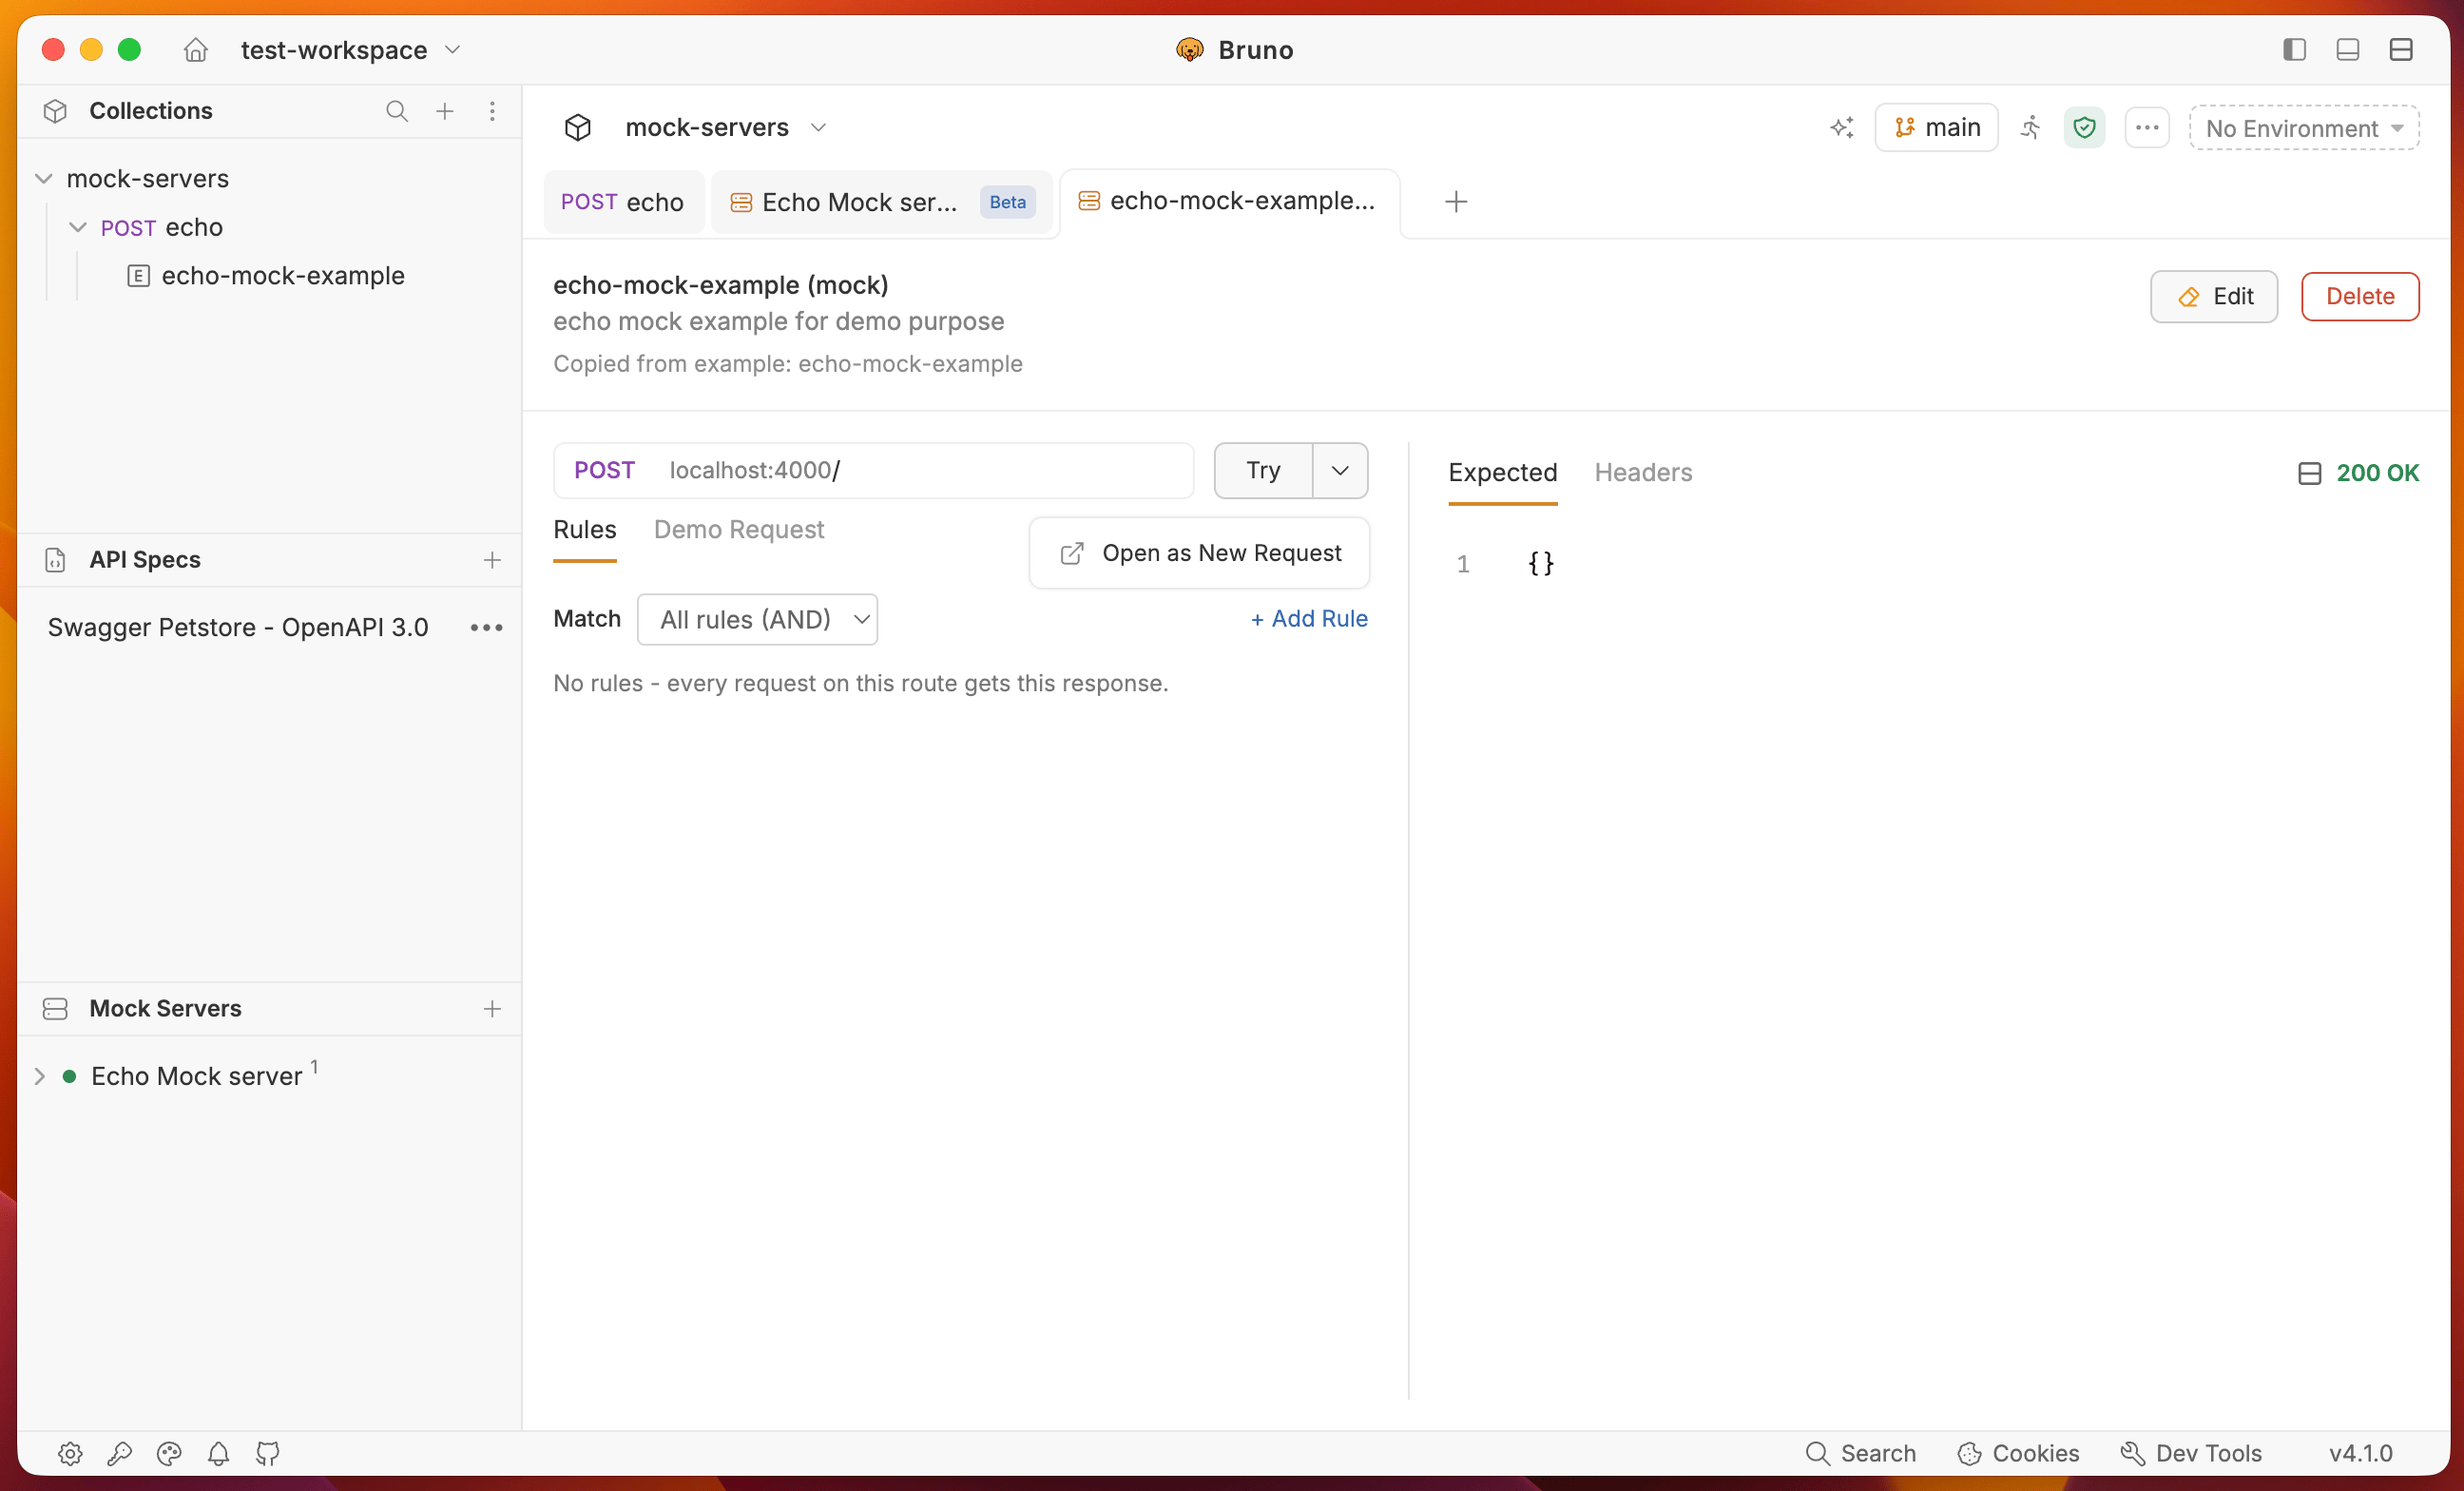 ### Rules and demo request
Use this decide to decide **when** this response is returned.
#### Rules
To add matching logic, click **Add rule** or the **Edit** icon (top-right of the response). The **Rules** and **Demo Request** tabs appear. See [Rules](/mock-servers/run-mock-server#rules) on the dashboard guide for field-level detail.
You can match on **body**, **headers**, and **query** parameters so the same path can return different payloads (admin vs guest, missing field vs valid body, and so on).
**Match** controls how those conditions combine:
| Match | Behavior |
| ----------------------------- | -------------------------------- |
| **All rules (AND)** (default) | Every condition must pass. |
| **Any rule (OR)** | One passing condition is enough. |
After you add or change rules, click **Save** in the top-right of the editor. Rules are not applied until you save.
### Rules and demo request
Use this decide to decide **when** this response is returned.
#### Rules
To add matching logic, click **Add rule** or the **Edit** icon (top-right of the response). The **Rules** and **Demo Request** tabs appear. See [Rules](/mock-servers/run-mock-server#rules) on the dashboard guide for field-level detail.
You can match on **body**, **headers**, and **query** parameters so the same path can return different payloads (admin vs guest, missing field vs valid body, and so on).
**Match** controls how those conditions combine:
| Match | Behavior |
| ----------------------------- | -------------------------------- |
| **All rules (AND)** (default) | Every condition must pass. |
| **Any rule (OR)** | One passing condition is enough. |
After you add or change rules, click **Save** in the top-right of the editor. Rules are not applied until you save.
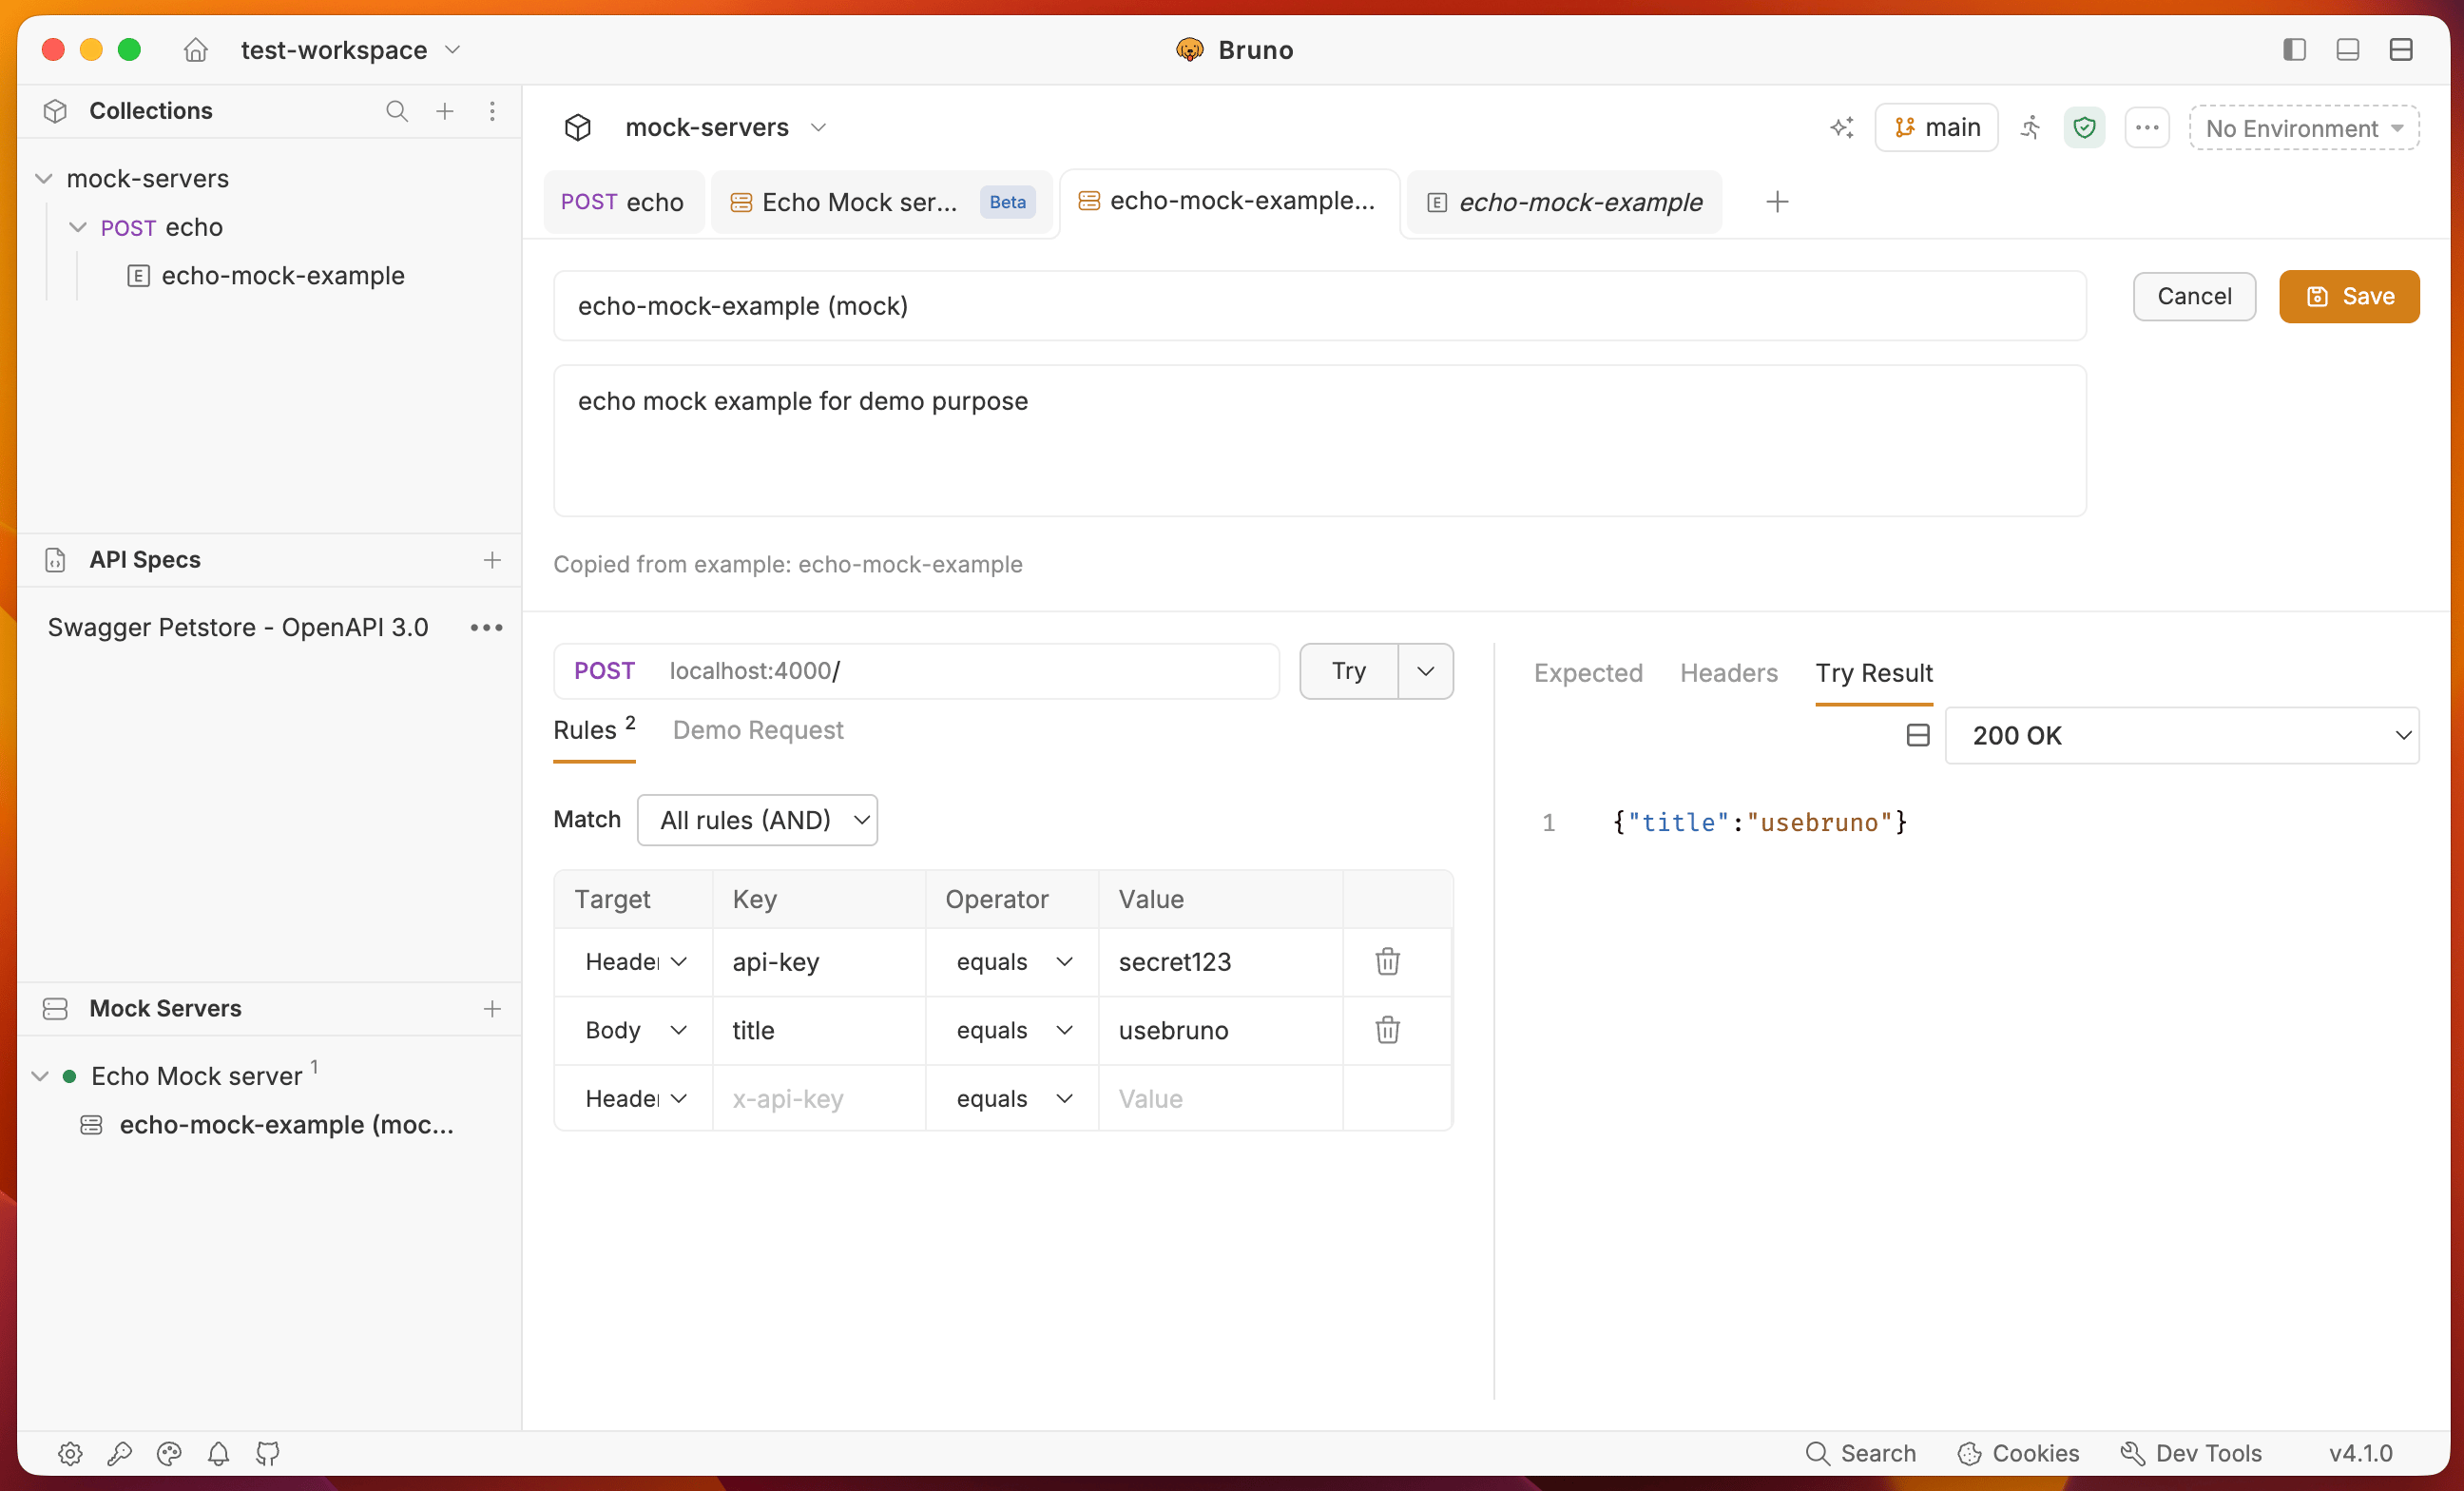 With the mock server running, click **Try** next to the response URL to send the demo request. Open the **Try Result** tab on the right to see the body and headers the mock returned.
**Demo Request** is generated from the rules you defined. It shows a sample request that would select this response.
**Open as New Request** will open the demo request in a new request tab with rules and demo request applied.
### Expected body and headers
Use this side to see **what** the mock returns: the **Expected** body and **Headers**, plus the status code.
The body can be JSON, HTML, text, or XML. Headers are independent of body type, set `Content-Type` and any other headers the client should see.
**Try Result** shows the response body and headers from **Expected** and **Headers** after you click **Try** (with the server running).
## 7. Inspect traffic
After the server is running, use the dashboard tabs to confirm routes and debug matches:
* **[Routes](/mock-servers/run-mock-server#routes-tab)** - every registered method and path, how many responses sit on that route, and hit counts.
* **[Request Log](/mock-servers/run-mock-server#request-log-tab)** - live incoming requests, which mock response was selected (or **No Match**), status, delay, and the Match Trace Inspector.
For the full control surface (delay, refresh, copy URL, filters), see the [dashboard walkthrough](/mock-servers/run-mock-server#dashboard-interface-walkthrough).
## Next steps
* [Mock Servers from OpenAPI](./mock-from-openapi) - generate the same kind of mock from an OpenAPI spec instead of collection examples.
* [Create a mock server](/mock-servers/create-mock-server) - collection, spec, and standalone sources.
* [Run a mock server](/mock-servers/run-mock-server) - dashboard, rules, routes, and request log.
With the mock server running, click **Try** next to the response URL to send the demo request. Open the **Try Result** tab on the right to see the body and headers the mock returned.
**Demo Request** is generated from the rules you defined. It shows a sample request that would select this response.
**Open as New Request** will open the demo request in a new request tab with rules and demo request applied.
### Expected body and headers
Use this side to see **what** the mock returns: the **Expected** body and **Headers**, plus the status code.
The body can be JSON, HTML, text, or XML. Headers are independent of body type, set `Content-Type` and any other headers the client should see.
**Try Result** shows the response body and headers from **Expected** and **Headers** after you click **Try** (with the server running).
## 7. Inspect traffic
After the server is running, use the dashboard tabs to confirm routes and debug matches:
* **[Routes](/mock-servers/run-mock-server#routes-tab)** - every registered method and path, how many responses sit on that route, and hit counts.
* **[Request Log](/mock-servers/run-mock-server#request-log-tab)** - live incoming requests, which mock response was selected (or **No Match**), status, delay, and the Match Trace Inspector.
For the full control surface (delay, refresh, copy URL, filters), see the [dashboard walkthrough](/mock-servers/run-mock-server#dashboard-interface-walkthrough).
## Next steps
* [Mock Servers from OpenAPI](./mock-from-openapi) - generate the same kind of mock from an OpenAPI spec instead of collection examples.
* [Create a mock server](/mock-servers/create-mock-server) - collection, spec, and standalone sources.
* [Run a mock server](/mock-servers/run-mock-server) - dashboard, rules, routes, and request log.